Showing posts with label tutorials. Show all posts

Monday, 12 October 2015

How To Make Paper Pinwheels

Paper pinwheels are so easy to make and add a touch of simple elegance if used as a backdrop during photoshoots.


You will need

Sheets of coloured paper - doesn't have to be card, photocopying weight paper is fine.
Glue gun or strong paper glue


Step 1

For large pin wheels, fold your paper landscape, for small size, fold it portrait.

Fold your paper into a concertina - you do not have to be too accurate.
I had folds roughly 1 inch in size.


Step 2

Fold your concertina in half, and glue in the middle


Step 3

For a fuller pinwheel, make 5 "quarters".
I used 5 for the large size and only need 4 for the small size


Step 4

Glue your "quarters" together


Hang them by cotton from the ceiling, or stick to your backdrop.  Or if you really don't have the time, you could always order my backdrop where I've done all the hard work for you!


Tuesday, 22 September 2015

How To Make A Lidded Box From Card

I often see photographers asking for nice ways to present their client's USB sticks after their sessions.

There are lots of gorgeous wooden and personalised boxes available, but what if you are running lots of mini-sessions and don't necessarily want to include the expense of your regular presentation boxes into these kinds of sessions?

In this tutorial, I show you how to make a lidded box from cardstock.

These are a low-expense item to make and you could easily use your brand colours, or have stickers printed, use ribbon, or even glue a small square print from the session on the lid - the possibilities are endless!


You will need


1. 2 sheets of cardstock in A4 size per box - approx 240gsm in weight
2. Double sided tape, or craft dots
3. Scissors to cut card
4. Ruler or flat edge


Watch my video for instructions


I hope you enjoy this tutorial and perhaps have a go at making some for your photography studio - if I can do it, you definitely can!  Please show me any images you take!

With thanks to Frances Stephenson Photography for the loan of her personalised USB

Sunday, 20 September 2015

How To Make A Lace Crown Photography Prop

Lace crowns look great perched on a newborn baby's head, on top of a toddler's head as well as worn by an older child.

Choose some really elaborate lace, or stick to plain and simple, and follow my tutorial to make your photography studio some new props!


You will need


1. Fabric Stiffener
2. Foil or a surface you don't mind getting messy
3. Lace
4. Tape Measure
5. Paint Brush
6. Scissors
7. Hot Glue Gun or fabric glue


Step 1

Decide the circumference you want your crown to be and cut your lace with an extra inch to spare.


Step 2 

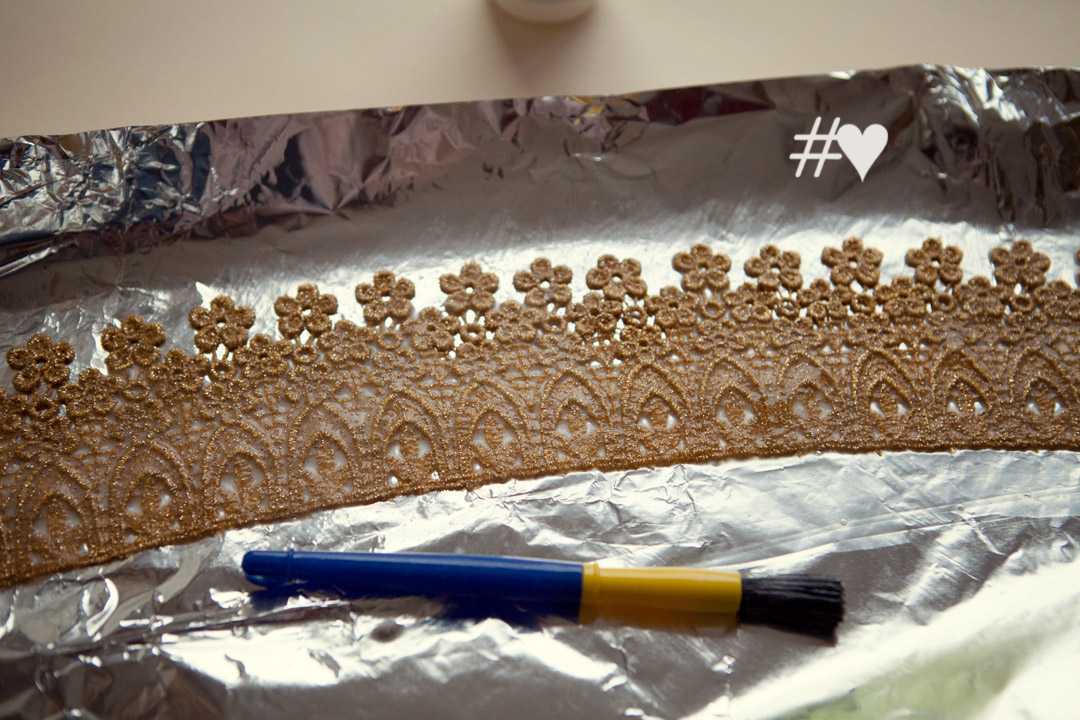
Place your cut lace onto your foil or other working surface and liberally coat with the fabric stiffener.  Use your brush to work it right into all the holes.  Turn over and make sure both sides are completely covered.


Wash your brush out thoroughly when finished if you want to use it again!  


Step 3

Leave to dry for several hours - ideally overnight on top of a radiator or in your airing cupboard, keeping it as flat as possible


Step 4

Once your lace is completely dry and stiff, overlap at the back using the excess you left.
Matching up any pattern, glue in place


Step 5

Place on your model's head!


With thanks to Twirly Girl Photography for these fantastic photographs showing the crown in use!


I hope you enjoy this tutorial and perhaps have a go at making some for your photography studio - if I can do it, you definitely can!  Please show me any images you take!


Thursday, 10 September 2015

How To Make A Newborn Bed Photography Prop

When I was a newborn photographer, I would walk round shops wondering to myself "can I put a baby in that?" but now I wander around thinking "what kind of prop could I make out of that"!

{Let's not talk about the time I shouted out loud to my mum who was out of earshot in the middle of a big shop "this would look great to shoot a baby on"}

I've seen some photographers photographing their newborns and babies on beautiful wooden beds and it occurred to me it would be fairly easy to use a side table to make one for your studio.


With thanks to Footsteps Photography for these beautiful examples


You will need

A side table with ornate legs
Paint or spray paint if you want to jazz it up a bit


The thing you want to look out for when searching for a table is the legs. 

(For the purpose of this tutorial I borrowed a friend's antique side table that she is selling in her online antique shop, and it wasn't totally ideal as the legs were a bit longer than I would have liked, but she wouldn't let me chop them down or let me paint or spray it a different colour.  Antique dealers are funny like that!)

But you could easily spray an old table gold, or paint it white and distress it for a more shabby chic look with some mini bunting.

Check out Car Boot sales, charity shops or junk shops or even local selling groups to pick up a table for fairly cheap.


Step 1

Turn your table upside down


Step 2

Layer with blankets and pose baby in the normal way.
That's it!


And the great thing is, if you're short of storage space, you can just use it as a table in your studio!

So now not only will you be pondering if something is big enough to "put a baby in", you will also be checking out the legs on furniture!

Tuesday, 8 September 2015

How To Make Tulle Pom Poms

In this tutorial I show you how to make pom-poms from tulle net fabric.

They are a fun and simple way to make fun and funky props for cake smash photography sessions.


You will need:

1) Cardboard
2) Stiff tutu net fabric
3) Ribbon or string to tie and fasten your finished pom-poms
4) 2 round objects of different sizes
5) Pen or pencil
6) Scissors to cut cardboard


Step 1

Draw around your larger round object and then the smaller size in the middle to create a dougnut.
You do not have to be exact with your placement.
I did mine by eye and although it's slightly off centre, it did not effect my finished pom-pom.


The measurement from outer edge to inside circle determines the size of your finished ball.
Mine measured 3 inches which resulted in a 6 inch pom-pom.

Increase or decrease that measurement for a larger or smaller ball.


Step 2

Cut 2 doughnut shapes from your cardboard and place together.


Step 3

Fold your fabric a few times and then cut into strips about 1 inch wide.
Again, you do not have to be accurate - I had some thick and some thin strips.


Step 4

Get winding!
Wrap your tulle strips round and round your doughnut layering as you go round.


Step 5

The more times you go round with your fabric the fuller your pom-pom is, but generally, you do not need to wrap around any more than about 10 times.


Step 6

Insert your scissors between the two layers of cardboard and cut.
Try and hold the tutu in place as you cut round.


Step 7

Insert your ribbon or string between the cardboard layers, pull tight and tie in a knot


Step 8
Remove the cardboard and gently fluff out your pom pom.


Why not make tutu pom-poms along with tissue paper pom-poms I've already shown you how to make (here)


Make some orange and black ones for Halloween, or lots of small white ones as snowflakes for Christmas sessions.

Friday, 4 September 2015

How To Make A No-Sew Baby Hat Photography Prop

There is nothing cuter than photographing your newborn and baby clients in props, but sometimes the cost can add up.  Whilst it's great to be able to spend on props when you are an established photographer (expenses, tax man, wink-wink), but how do you build up your prop supplies when you are just starting out?

In this tutorial I show you how you can make a top knot hat with absolutely no sewing!


You will need

A pair of scissors
Long sleeve t-shirt - adult size


Step 1

Iron your sleeve (I didn't because, well, my ironing table currently has piles of "important stuff" on it)


Step 2


Cut your sleeve as straight as you can near the armpit end.  You do not have to be too neat.

The great thing about jersey (t-shirt material) is, it doesn't fray!  In fact, if you stretch it, it will ping back into a neatly rolled edge!


Step 3

Tie a knot in it!


If your edge isn't looking that neat, you can roll it upwards a few times when it is in position on baby.


The larger the t-shirt size, the larger the baby it will fit.

So next time you are panicking you don't have any new props for your next session, or you have twins booked in your diary, head down to your nearest charity shop and snap up all their funky t-shirts!


I hope you enjoy this tutorial and perhaps have a go at making some for your photography studio - if I can do it, you definitely can!  Please show me any images you take!

PS - for all those who ask after every tutorial, I photograph on one of our wooden floor backdrops - you can find the design here